How to Change a Normal Printer into a Wireless Printer - Are you one person who often uses a printer in his daily life? both in the office and at home. Usually when you want to use print, a cable is needed that will connect the printer to a computer or laptop. If the cable is not there, of course you will not be able to print documents from a computer or laptop.
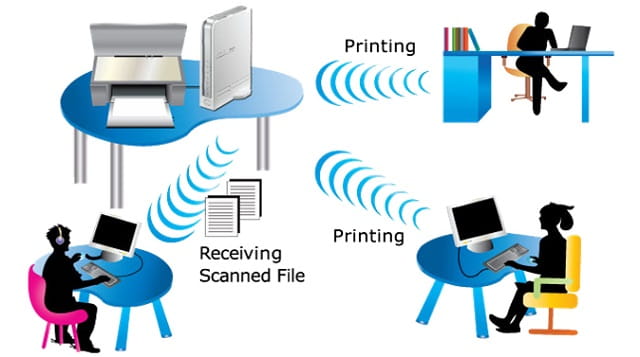
Unlike the case when you use a Wireless Printer, where this Wireless printer uses wifi media instead of cable. So, you no longer need a cable that will connect the printer and computer. You can directly print documents from a computer just by connecting a computer or laptop that is used to WiFi from the printer.
The existence of a Wireless printer is of course very helpful and makes it easy to print documents. Usually when someone does a job using a laptop or computer that is not connected to the printer, then when they want to print the work they will copy the file that will be printed onto the flashdisk then print it using a computer connected to the printer. sometimes also when using a laptop, the laptop will be moved so that it can be connected with a printer using a cable.
This situation of course will make you a hassle and make a waste of time. But what if you don't have a wireless printer that can make your work faster, but only have a printer that uses cables to connect the printer to the computer. You don't worry because the normal printer can actually be changed so that it can be accessed using Wireless or WiFi. Of course you don't have to buy a Wireless printer, which of course costs far more than a normal printer.
How do you change an ordinary printer to a wireless printer?
Please note that you do not have to disassemble the printer then add WiFi devices so that this method works. All you need is a computer connected to the printer using a cable. Through this computer the printer will be shared using WiFi, so that later on you can access the Printer via WiFi. No less important is that the computer connected to the printer must have a WiFi adapter or can use WiFi.
So that you can share printers to change a regular printer to a Wireless printer, please follow the steps below.
Step 1
Step 1
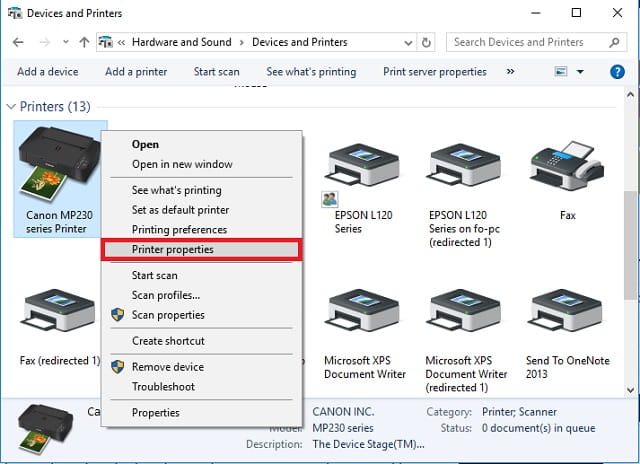
On a computer connected to a Printer via a printer cable, please open the Control Panel. Then go to the following Control panel directory.
Control Panel\Hardware and Sound\Devices and Printers
Here you will see a list of printers connected to your computer or laptop.
Step 2
In a fine printer shared via WiFi, please right-click then select Printer Properties.
Step 2
In a fine printer shared via WiFi, please right-click then select Printer Properties.
 Step 3
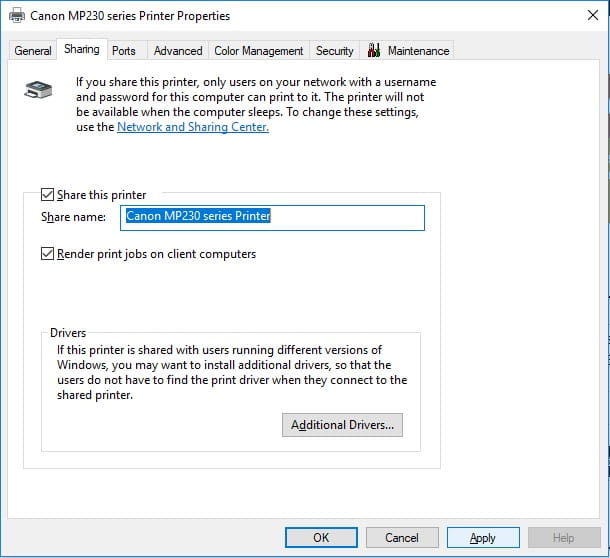
In the printer properties window, please click the Sharing tab and then check the Checbox Share this printer. You can also change the share name as you wish, this share name will appear on another computer or laptop as the name of the printer. When it's finished please click Apply then click Ok.
 Step 4
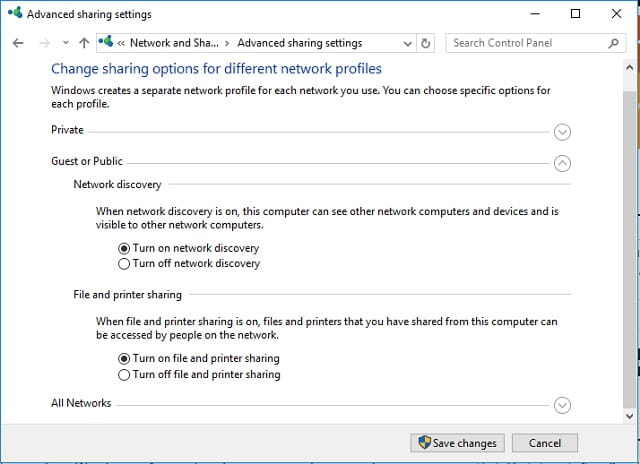
So that the printer can be accessed from another computer via WiFi, please open the Control Panel then go to the following directory.
Control Panel\Network and Internet\Network and Sharing Center
then click Change advanced sharing settings in the left panel.
Step 5
Then please click Guest or Public then click Turn on network discovery and Turn on file and printer sharing. After that, click Save Changes.
Step 5
Then please click Guest or Public then click Turn on network discovery and Turn on file and printer sharing. After that, click Save Changes.
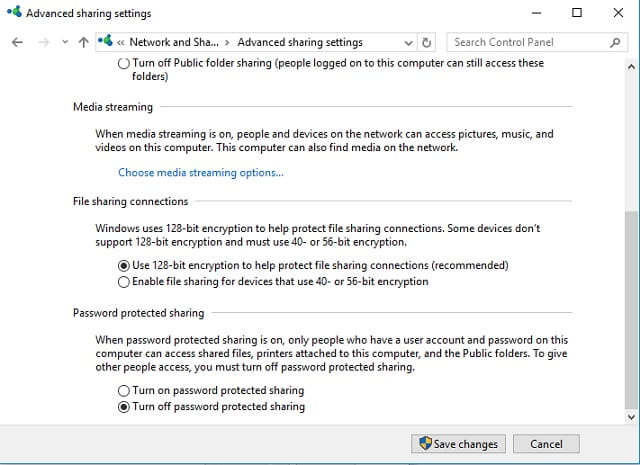
 Step 6
So that when you access the printer via WiFi not asked for a password, then please click All Networks, then click Turn on password protected sharing then click Save Changes.
 Now you have successfully shared a printer or changed an ordinary printer that uses cables to a Wireless printer. In order to use this printer, please read the article How to use a wireless printer.
Share printers to different Windows Bit (Architecture)
In some cases, when you want to use a shared printer via WiFi, you cannot use it to print documents. Suppose a computer or laptop connected to a printer uses Windows 64 bit then a Laptop that will be connected to a Printer via WiFi using 32 bit Windows or vice versa, then you will not be able to directly connect to the printer and print documents. In order to connect to the Printer and print documents, you will be asked to install the printer driver on the laptop that will be connected via WiFi.
This situation of course will make a bother when every want to connect a new laptop to the WiFi printer must install the printer driver, especially if you do not have it on the laptop used. But don't worry, you can do a little setting so that if you want to connect is a new laptop and you haven't connected before you don't need to install the driver. For that, please follow the steps below.
Step 7
Prepare the printer driver that is used, both for Windows 32 bit and Windows 64 bit.
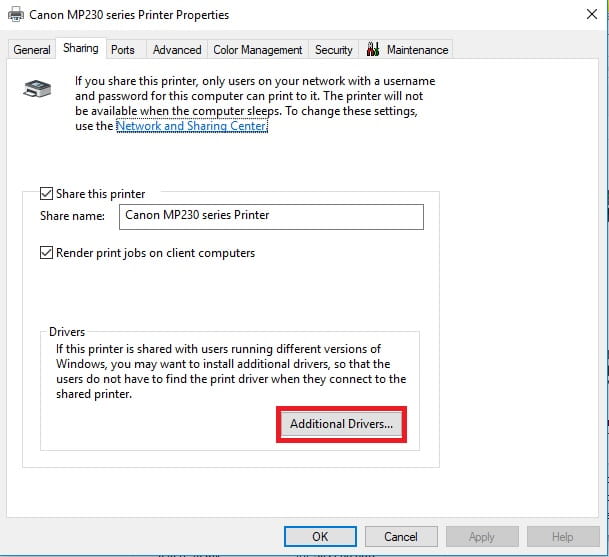
Step 8
On a computer connected to a printer using a Printer cable, please do steps 1-3 above. Then on the sharing tab, please click Additional Drivers.
Prepare the printer driver that is used, both for Windows 32 bit and Windows 64 bit.
Step 8
On a computer connected to a printer using a Printer cable, please do steps 1-3 above. Then on the sharing tab, please click Additional Drivers.
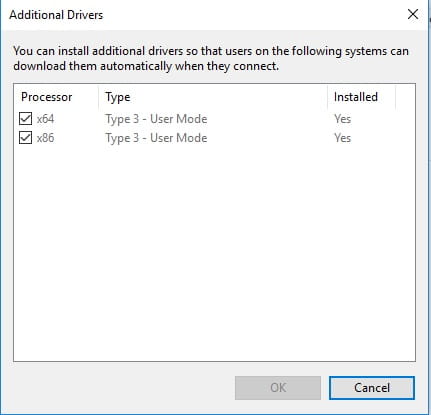
Step 9
In the additional drivers window, if your computer uses Windows 64 bit (x64), it will be seen that the driver for Windows 32 bit (x86) is not installed, so when you access it using 32-bit Windows it will not be able to connect. To solve this problem please check the x86 checkbox, then click Ok.
Step 10
The printer drivers install window will appear. Please extract the 32 bit printer driver for Windows that you have prepared. Then click Browse.
Step 11
In the window that appears, look for the file with the .inf extension at the location where you extracted the printer driver. If it has been found, click the file then click Open. In the install driver window, please click Ok. If there is a warning please click Ok.
In the window that appears, look for the file with the .inf extension at the location where you extracted the printer driver. If it has been found, click the file then click Open. In the install driver window, please click Ok. If there is a warning please click Ok.
Step 12
If it's finished please click Ok in the Additional drivers window. Please do the opposite if you are using a Windows 32 computer that is connected to Prinnter via a printer cable. Now you can connect to a printer via WiFi even if you use a different Windows architecture.
If it's finished please click Ok in the Additional drivers window. Please do the opposite if you are using a Windows 32 computer that is connected to Prinnter via a printer cable. Now you can connect to a printer via WiFi even if you use a different Windows architecture.
That's how to turn a normal printer into a wireless printer or sharing printer via WiFi. For the record, you will only be able to access the printer that has been shared if the computer connected to the printer uses a printer and computer or laptop that you will connect to the printer via WiFi connected to the same WiFi network. So of course a computer connected to a printer using a cable and a computer that will access via WiFi must have a device so that it can use a WiFi network.
If it turns out that at your location there is no WiFi network, then you can make the computer connected to the printer using the printer cable as a Hotspot, then connect the other computer to the hotspot that has been created. This way you can freely print documents via WiFi.
This method will also work on all editions of Windows, for example you use a computer with a different edition of Windows. Some use Windows 7, Windows 8, and Windows 10, so this method will still work and WiFi printers can still be used to print documents.


